3. Basic features
This chapter is intended for teachers that want to start using VPL or need details of the basic VPL features. Teachers here will see how to create and configure programming activities for their courses and how VPL helps to monitor students’ work.
3.1. Creating VPL activities
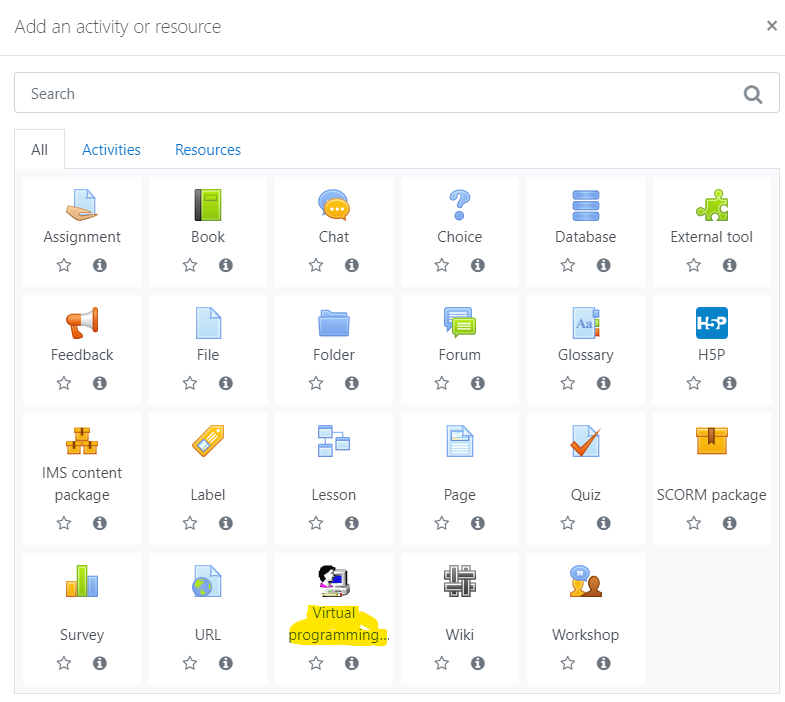
To create a new VPL activity, as other activity types, you must set the course in editting mode by pushing the “Turn editing on” button. Then select the section where you want to add the activity and click on “Add an activity or resource” link.

You must select here the Virtual Programming Lab activity.
All details of options you can set in this step will be shown below. After creating the activity, you can change these options at any time.
If you want to create a simple activity and start playing, follow the steps in the subsection Creating a simple activity.
Creating new VPL activity by duplicating another is an easy way to obtain a new activity preconfigured. VPL fully supports activity duplication.
3.2. Editing settings
This subsection shows the options you can use when creating a new VPL activity or when you update activity by clicking on the “Edit settings” link.
3.2.1. General
3.2.1.1. Name
The name of the activity is used to identify it. The name must be plain text. This is the only required field in this form.
3.2.1.2. Short description
The short description is used to describe the activity when the full description is not available. The short description must be plain text.
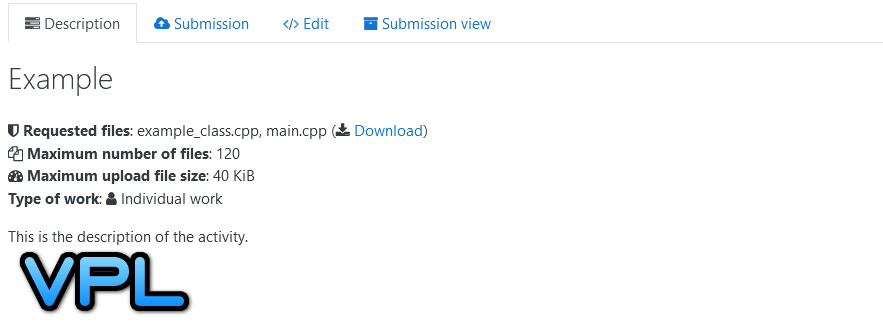
3.2.1.3. Full description
The full description is used as detailled descrition of the the activity. It is in HTML format and may containt images, mathematic equations, etc.
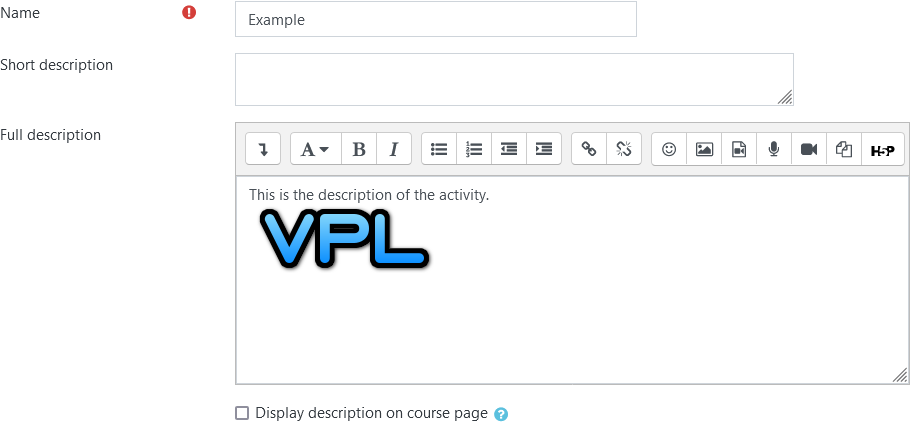
Description example
Note
Full description may be affected by the The based on feature.
If check the “Display description on course page” checkbox, the description will be shown on the course page just below the link to the activity.
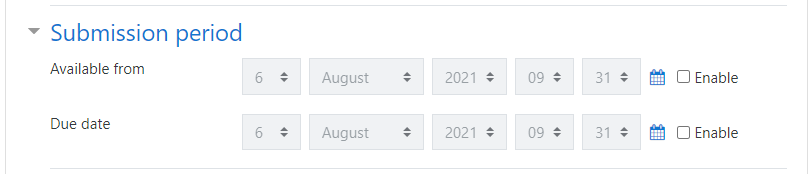
3.2.2. Submission period
This setting allows limiting the time that students can submit files.
3.2.2.1. Available from
This optión set a time to start showing and usable the activity, before this time the activity is not available for students. If not set the activity will be usable if it is shown. If set and showed the students can read the description before the “available from” but can not submit files.
Note
When the start time (available from) is close to the current time (less than 5 minutes) the system will show the activity and the students can access the descriptión.
3.2.2.2. Due date
This optión set a time to stop accepting submissions. If not set, while the activity is shown the students submit files. After the due date, students can access the activity to see descriptions download last submissions, etc.
3.2.3. Submission restrictions
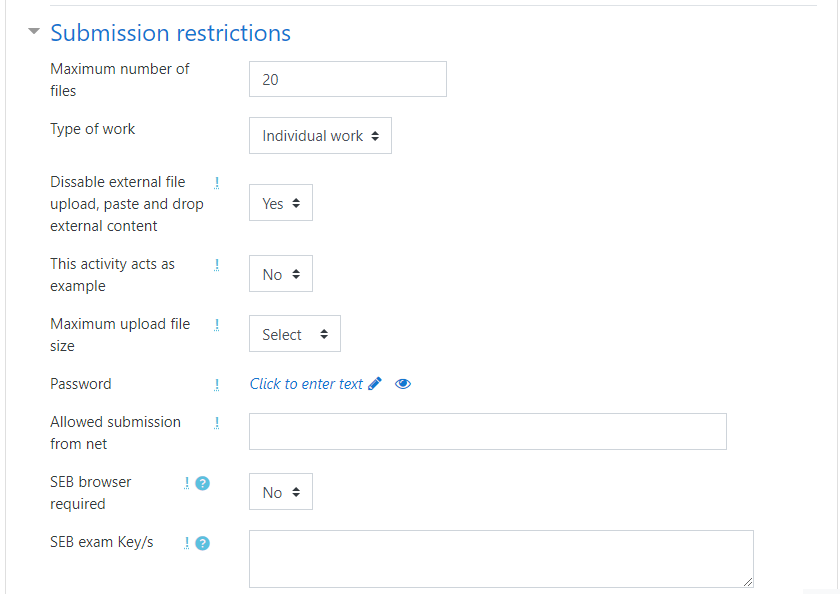
3.2.3.1. Maximum number of files
This option limits the number of files students can submit each time.
3.2.3.2. Type of work
This option allows switching from individual work (the default) to group work. To activate group work you must set a grouping of groups, each group with a team of students. Group work means that any student’s submission belongs to the group. All group members can do submissions, access the last submission, and will get the same grade for the activity.
Note
A student cannot belongs to two or more groups of the grouping. Submissions belong to the group, one student can be moved or removed from a group with no effect in submissions.
3.2.3.3. Disable external file upload, paste, and drop external content
If the teacher sets this option, the students will not be able to upload files or paste code from external sources. The only way to write code is by typewriting in the IDE. The IDE still supports internal copy/paste functions.
Se also Using VPL for exams.
3.2.3.4. This activity acts as an example
If the teacher sets this option the activity will be read-only, students can’t submit or change code. The teacher must write the example files in the Requested files. These files will be the example code that students can run or debug.
3.2.3.5. Maximum upload file size
The teacher can here set the maximum size of each file accepted in this activity.
Note
Maximum upload file size may be affected by the The based on feature.
3.2.3.6. Password
Teachers can set a password for each activity. The student needs to enter the password to access any element of that activity (except the title). Entering the password gives permission to access the activity during the current session of the student, even if the key is changed. A common use is to give students the password to start the activity and change it once introduced, which prevents using the given password after the start of the activity.
Se also Using VPL for exams.
Note
Changing the password after all students access may give extra security.
3.2.3.7. Allowed submission from net
The teacher can set which machines or networks can access the activity. This will prevent to access the activity from outside of the authorized networks. This feature may be useful for exams. The formats accepted are:
- xxx.xxx.xxx.xxx (IP). Example 1.2.3.4
- xxx.xxx.xxx.xxx/nn (number of bits in the mask). Example 1.2.3.128/4
- xxx.xxx.xxx.xxx yyy (IP range in the last group). Example 1.2.3.4 8
- xxx.xxx.xxx or xxx.xxx.xxx (incomplete address). Example 1.2.3
For allowing multiple networks or IPs, separe them by “,”. Example 1.2.3.4, 1.2.3.128/4, 1.2.3.4 8, 1.2.3
Se also Using VPL for exams.
3.2.3.8. SEB browser required
If set, the activity will require the use of the Safe Exam Browser (SEB).
3.2.3.9. SEB exam Key/s
If set, the activity will require the use of the Safe Exam Browser (SEB) with specific configuration by the “Browser Exam Key”. This feature may be useful for exams. See https://safeexambrowser.org
Se also Using VPL for exams.
3.2.4. Grade
in addition to the standard grade setting, there are options to control the evaluations the students do. This control is done by penalizing the final grade based on the values of two options:
- Free evaluations. This is the number of automatic evaluations students can request with no penalization.
- Reduction by automatic evaluation. Once the student expends all the free evaluations, this option is applied. The value can be a fixed value or a percentage. For each new automatic evaluation, the reduction is applied to the current grade. The percentage is applyed to the current grade, not the maximum grade. A repeated evaluation on the same submissions does not count.
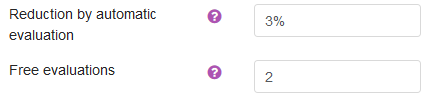
Example 1
With maximum grade set to 10, Free evaluations set to 3, and Reduction by automatic evaluation set to 0.5. A students with 5 evaluations and a initial grade of 8 will get 7 points.
8 - (5 - 3) * 0.5 = 7
Example 2
With maximum grade set to 10, Free evaluations set to 2, and Reduction by automatic evaluation set to 10%. A students with 4 evaluations and a initial grade of 8 will get 6.48 points.
8 - (10% of 8) = 7.2
7.2 - (10& of 7.2) = 6.48
3.3. Using VPL for exams
VPL has several mechanisms that help in exams and increase the reliability of the code authorship. Some of these mechanisms are:
- Control access to activity by password. See Password setting.
- Allowing access to IP machines or networks. See Allowed submission from net setting.
- Limiting how the students write the code. See Disable external file upload, paste, and drop external content setting.
- Supports for SEB. See SEB exam Key/s setting.
- Showing exams time left at IDE.
These mechanisms can be used in the combination that is deemed most convenient. All these mechanisms are set in the “Edit settings” of the activity. Showing the time left in the IDE is not switchable.
3.4. Test cases
To use the feature of automatic program evaluation of VPL teachers must populate the “vpl_evaluate.cases” file going to .
3.4.1. Creating automated tests
To start playing teacher can see the picture below and use the auto-complete feature of the editor (Ctl+space), but notice that the exact output match must go in double-quotes. See a detailed explanation of this feature in chapter Automated program assessment.
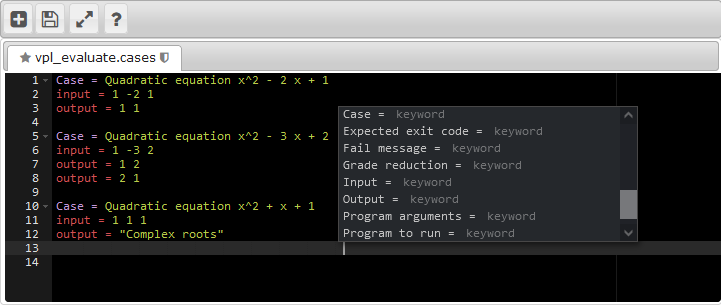
Editing vpl_evaluate.cases with two cases and auto-complete (Ctl-space)
3.5. Execution options
This options can be set going to .
3.5.1. Based on
This powerful feature allows us to inherit the options and files of other VPL activities. See The based on feature for more details.

3.5.2. Selecting programming language tools
By default, the system selects the tool used for running and debugging programs based on the filename extension of the submitted files. The system searches for a know extension following the order of submitted files, once a known extension is found the system uses the default associate tool. See Languages supported for details.
This option allows setting the compiler/interpreter or debugger to use. For some programming languages, different versions are available, for example, python 2 or python 3, C ANSI or C ISO 11, etc.

Selection of run and debug script.
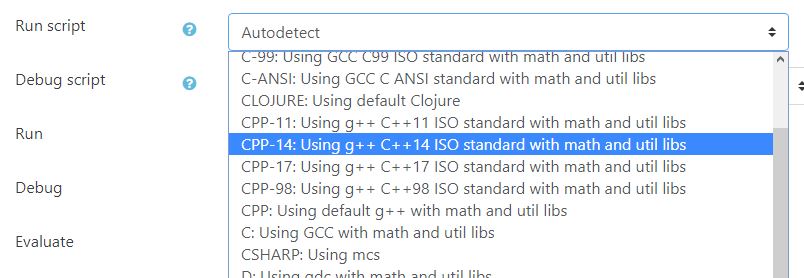
Selecting run script.
Note
Run and debug may be affected by the The based on feature.
- Run: The teacher must set to ‘Yes’ to allow the students to run programs in IDE.
- Debug: The teacher must set to ‘Yes’ to allow the students to debug programs in IDE.
- Evaluate: The teacher must set to ‘Yes’ to allow the students to run automatic evaluations.
Note
Users with grading capability can always run, debug, or evaluate.
- Evaluate on submission - The submission is evaluated automatically when it is uploaded, but not when saved in IDE.
- Automatic grading - If the evaluation result includes grading, they are used to set the grade automatically in Moodle grade book.

3.6. Requested files
This feature allows teachers to control the file names students submit and also to create activities in which the students must complete a task.
The teachers can set the names of the files that the students must submit and the initial content of these files. The teacher must use the editor to set the file names and their content. Notice that for some programming languages in VPL the order of the files may be important, see Languages supported for details.
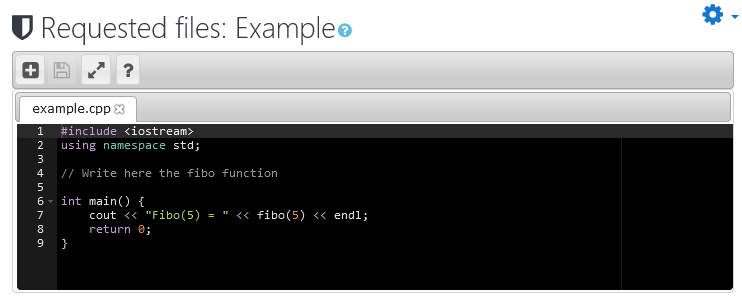
The number of files must be less or equal to the max number of files set in the “Edit settings” of the activity. If the teacher don’t set names for all the files, the unnamed files are optional and the student can use any name.
This set of files are available for download with the description of the activity. The first time the student access the IDE, the editor load these files with their content. The IDE has an option to reset these files to their initial content.

Note
If the name of files changes after the students start working on the activity, the students can need to move manually their code to the new files.
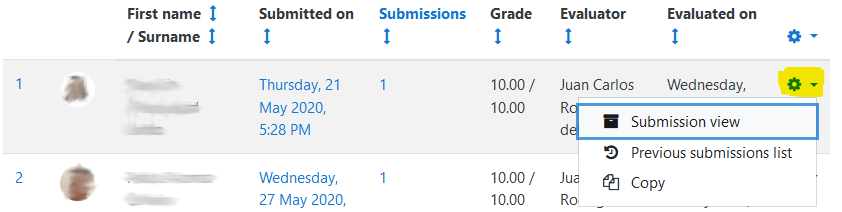
3.7. Submissions list
This report shows the current situation of the students’ tasks in the activity, allowing multiple actions such as accessing each student’s submissions, evaluating, modifying submissions, automatic battery evaluation, viewing other reports, etc.
3.7.1. Submissions report
This report shows for each student the following columns:
- A sequence number to identify easily the number of students that match any criteria. If clicked, goes to edit a copy of the last submission in the teacher’s workspace.
- The student photo. Omitted if there are too many students. If clicked, goes to the student’s profile.
- The student’s full name.
- The last submission date and time. If clicked, shows the student’s submission.
- Number of submissions saved in the system. If clicked, goes to the student’s previous submissions report.
- If available, the proposed or final grade. If available and clicked, goes to student grade.
- If graded manually, the name of the evaluator.
- If graded, the date and time of grading.

The actions get by clicking, are also available at the action menu at the end of each student’s row.
The report can be ordered as ascending or descending by any column.
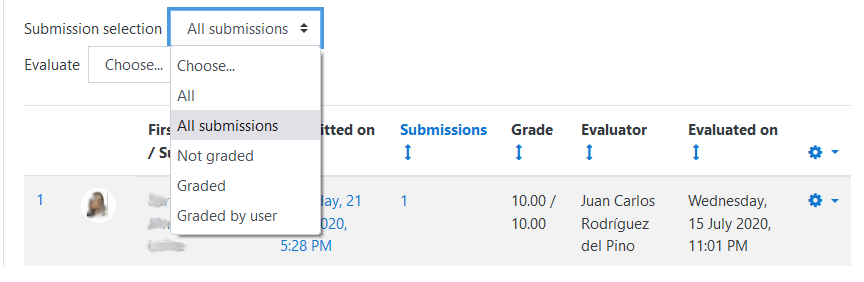
3.7.2. Filtering students
The “submission select” option allows to filter the students:
- All: Shows all students with o without submissions.
- All submissions: Select the students with submissions. This is the default option.
- Not graded: Select the students with submissions not graded.
- Graded: Select the students with submissions graded.
- Graded by user: Select the students with submissions graded by the current user.
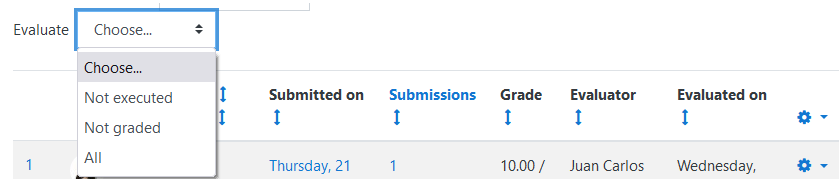
3.7.3. Batch evaluation
The “Evaluate” option allows to launch a batch evaluation of the selected students and submissions that match the criteria:
- Not executed: Evaluates the submissions not previously evaluated.
- Not grade: Evaluates the submissions not graded.
- All: Evaluates all submissions.
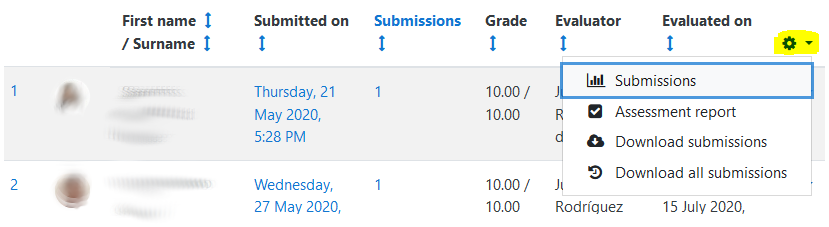
3.7.4. Other reports and downloads
The action menu at the end of the header row allows access to the other reports and downloads that are shown below.
3.7.4.1. Submissions (time spent report)
This graphic report is calculated based on the submissions saved and shows the number of students by hours spent in the tasks. Also shows the average of periods of work of each student and the time spent in the largest period.
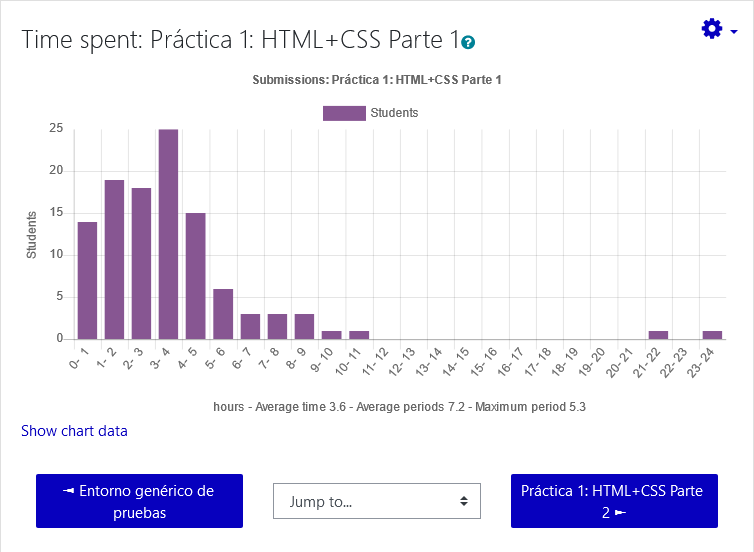
An example of submissions (time spent report)
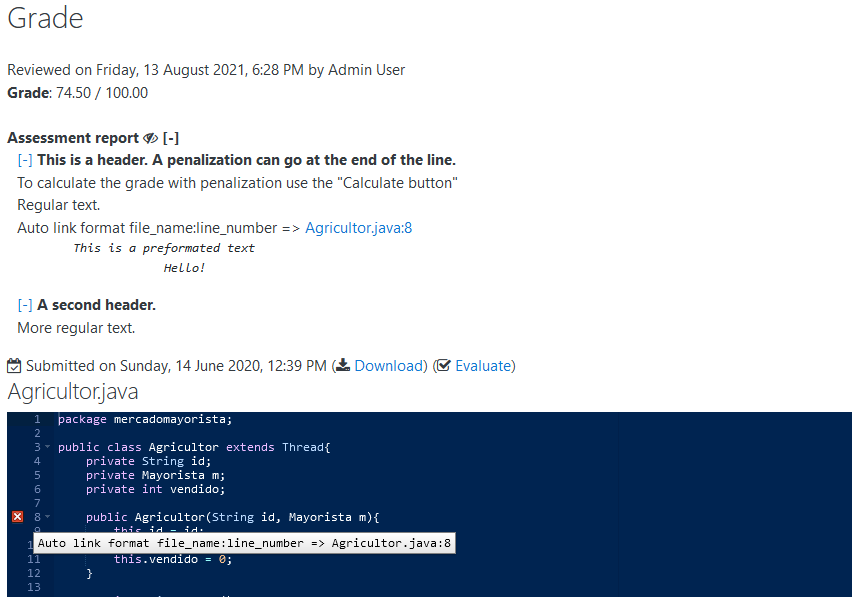
3.7.4.2. Assesment report
This report is similar to the “Submission list” but showing the details of the automatic evaluation and final feedback, for each student shows the following field:
- A sequence number to identify easily the number of students that match any criteria. If clicked, goes to edit a copy of the last submission in the teacher’s workspace.
- The student photo. Omitted if there are too many students. If clicked, goes to the student’s profile.
- The student’s full name.
- If available, the proposed or final grade. If available and clicked, goes to student grade.
- The automatic evaluation result and final assesment if available.
- Action menu to access the student’s submission.
3.7.4.3. Download submissions
This action downloads a ZIP file containing the last submission of each student. The zip file contains for each student a directory with name + id + username. The directory contains another directory with the name date+time of submission that contains the submissions files. There is another sibling directory with name date+time + ‘.ceg’ that contains the files: compilation.txt, execution.txt grade.txt, and gradecomments.txt.
An entry example:
Jone Doe 13 jone
   2021-05-21-10-12-45
      myclass.h
      myclass.cpp
      main.cpp
   2021-05-21-10-12-45.ceg
      compilation.txt
      execution.txt
      grade.txt
      gradecomments.txt
3.7.4.4. Download all submissions
This action is the same that Download submissions but containing all the saved submissions of the students.
3.8. Similarity
This feature search for similarity in a set of files generating a report of similar pairs of files, ordered from most to fewer similar. The basic set of files are the last submitted files in the activity, and the form allows adding other sets of files for searching.
The search uses a mix of three different metrics. Code changes affect in a different way to each metric.
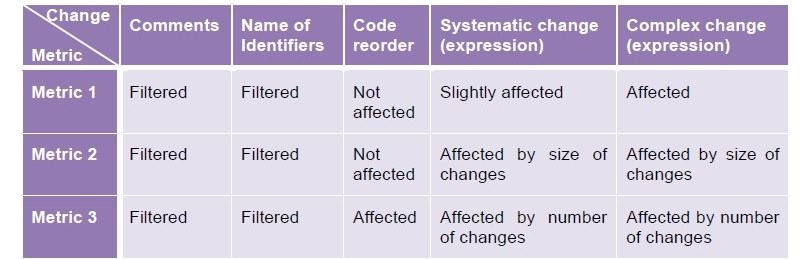
Effects on the metrics of different code changes.
See Fighting plagiarism: metrics and methods […] in VPL EDULEARN11 Proceedings for more details.
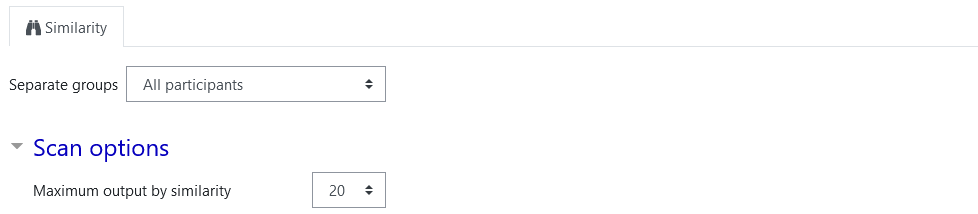
3.8.1. Scan options
The parameter “Maximum output by similarity” is used as a cut point for the more similar selected pairs by metric and has no other influence.
The difference of a report setting “Maximum output by similarity” to 40 and other setting it to 45 is that the new report must be the same but with 5-15 new pairs with less similarity. Notice that if we have pairs with the same similarity the output may vary.
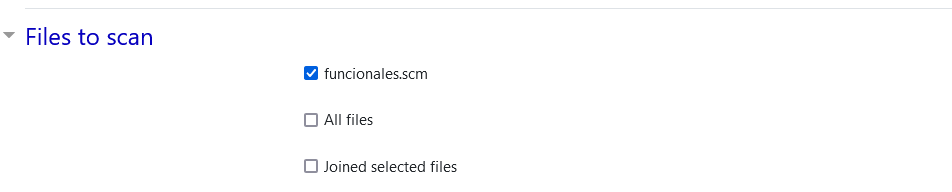
3.8.2. Files to Scan
This option allows selecting the file names to compare. Notice that these files must be in Requested files. Also can select to compare all files regardless of name or joining all files on each student’s submission.
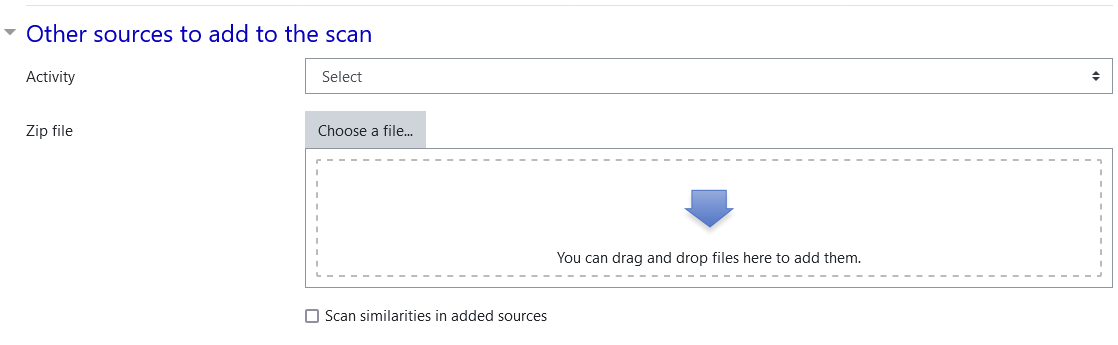
3.8.3. Other sources to add to the scan
These options allow to incorporate more file sets into the search. An option allows adding another VPL activity to the search, activities of other courses are available in this selection. Another option allows adding a zip file containing the set of files to add to the search.
By default, these files are not compared to each other. The last option allows to enable it. Using this option on an empty activity and adding a zip file containing the set of files to scan, allows using this feature for search similarity on external files.
3.8.4. Using the similarity report
The report orders the output from more to less similar pairs. Each report row shows first filename and student, similarity rate, and second file and student. The similarity rate has the format of “metric1 percent | metric2 percent | metric3 percent | asterix (1..3)”. Each metric result as a percent, also shows “*” to indicate the metrics that set the pair in an order position less than Maximum output by similarity. After the ordered pairs, the report shows clusters of similar submissions.
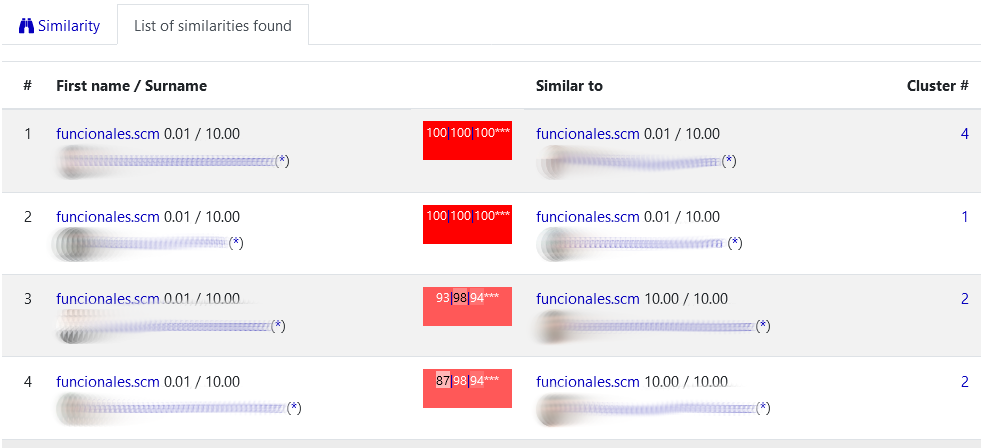
Example of similarity report
The system tries to help the teacher to compare pairs of files by showing them side by side and adding blank lines to try to align similar lines of code. You must click on the similarity rate of a pair of files to get this side by side report. Also, by clicking the (*) near the student’s name an individual report is generated.
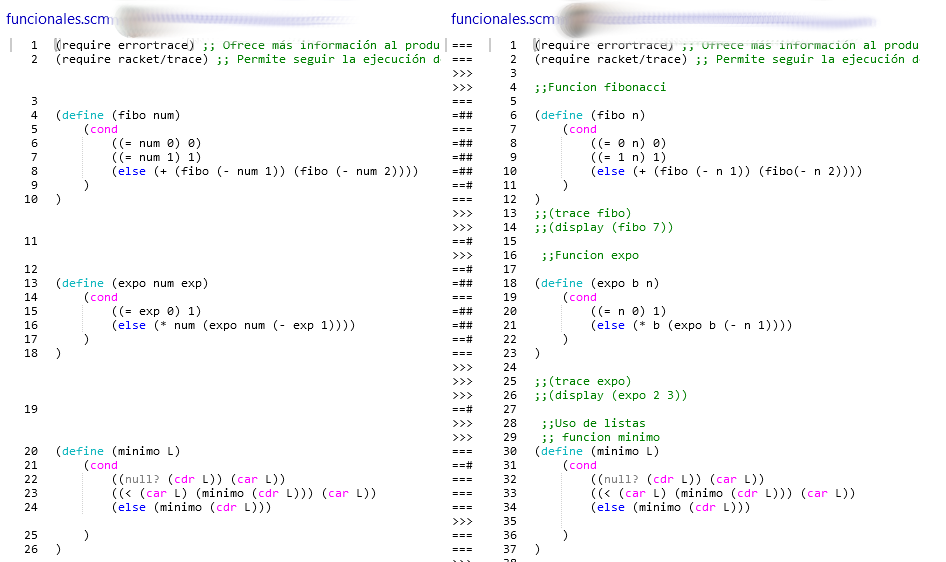
Example of side by side file compartion report
The side-by-side file report shows in the middle of the two files the differences between the two paired lines using a code:
- ===: The two lines are identical.
- <<<: The left line is not present in the right file.
- >>>: The right line is not present in the right file.
- ==#: The two lines without spaces are identical.
- =##: The two lines without alphanum are identical.
- ###: The two lines do not match any previous criteria.
Taking into account that the similarity report can give “false positives” and that the report has no external consideration that may affect the case. The use of similarity reports can follow these considerations and recommendations:
- The similarity report is NOT criteria to assure that plagiarism happened.
- The report is information for teachers but never must be used as a direct verdict.
- Always must be one or more teachers who judge the case.
- The teacher must have proofs based mainly on the code and not on the similarity report of VPL.
- The only trustable report about the possibility of unfair behavior is generated by a teacher, based on his own criteria.
- The similarity report can help the teacher to select what pair of submissions must be reviewed in detail.
- A common way to study the report is reviewing the pairs from most to less similar and stop reviewing when found enough adjacents “false positives”.
Note
In this context, a “false positive” is pair of files that the metrics indicate a high similarity but an expert indicates that there is no reason to considered plagiarism.
3.9. Test activity
To test the activity you can switch temporarily to the student role. But this way to test the activity will allow students to access the activity if you don’t temporally “Restrict access” to the other students. However VPL allows test activities without changing the role by accessing the menu “Edit settings - > Test activity”. There the teacher can access the activity in a similar way as a student does but in a specific workspace for him. The difference are the Previous submissions list , Grade and that teacher can use all options (run/debug/evaluate) regardless of the setting in Execution options.

The activity menu as shown to the teacher role

The activity menu as shown to the student role
3.9.1. Description
This page shows the description of the activity and the different settings that affect the task. The settings shown are different based on the role of the user. Teachers get more detailed information on settings.
Example of a description page shown to the student role
3.9.2. Submission
This page allows students to upload the files to submit. This interface has some drawbacks, students can not set directories for the files uploaded. Also notice that this page may be restricted by the Disable external file upload, paste, and drop external content option. It may more convenient to use the Edit page that has a similar effect and is more flexible.
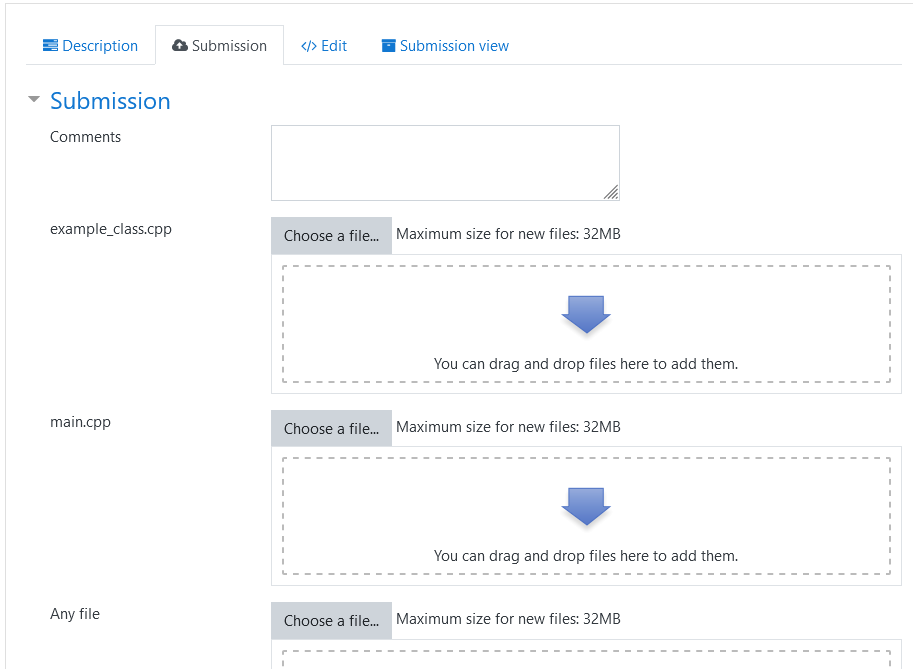
Example of submission page shown to the student role
3.9.3. Edit
This page gives access to students to edit, run, debug, evaluate a new or previous submission. Saving here is equivalent to upload a submission. This page allows teachers to test the activity or access a student’s submission to run/debug/evaluate it or even change the student’s submission when saving. The teacher can know if is accessing a student’s submission because in that case, the menu shows the student’s name.
For more details about this page see IDE section.
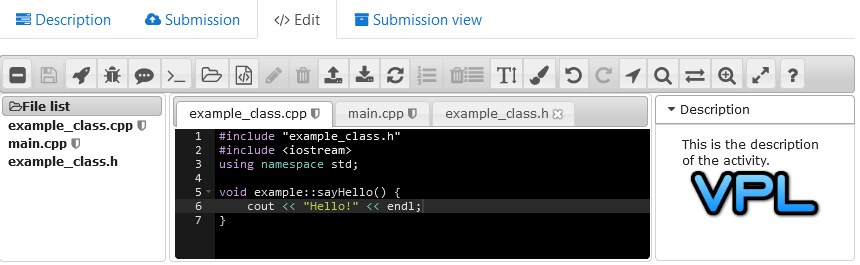
Example of editing files by the student role
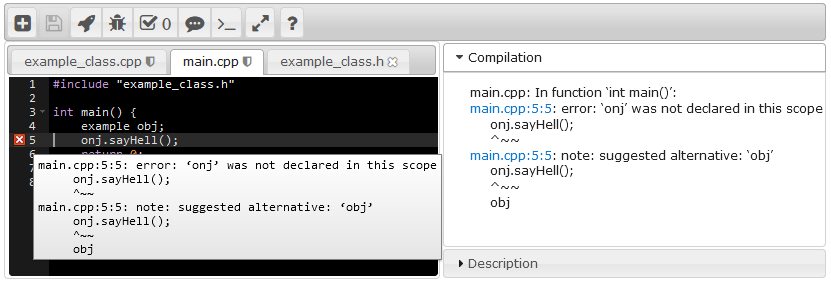
Example of running code by the student role
3.9.4. Submission view
This page shows students their last submission. Allowing also to download the submission as a zip file or ask for automatic evaluation if available. This page also shows teachers the corresponding student’s last submission.

Example of submission view page shown to the student role
3.10. Grading a submission
This page allows teachers to manually grade a student’s last submission. The page shows a form to introduce the grade and the comments (feedback) that will see the student. The form shows also different actions on the grade of the submission:
- Grade: This input must not be empty. The penalization (grade reduction) for asking automatic evaluations applies to the introduced value.
- Comments: This is a multi-line entry with the feedback for the student. The content of this input is formated when shown.
- Grade button: this button saves the grade to the Moodle grade book.
- Grade & Next button: This button, available on batch grade, saves the grade to the Moodle grade book and goes to the next student’s last submission.
- Copy button: This button asks the system to copy the student’s submission to the teacher’s workplace. The teacher can there check the student’s code by running, debugging, or fixing it.
- Evaluate button: This button asks the system to run the automatic for this submission. The automatic evaluation does not change a manual grade.
- Calculate button: This button asks the system to review the comment and calculate the grade based on its formating.
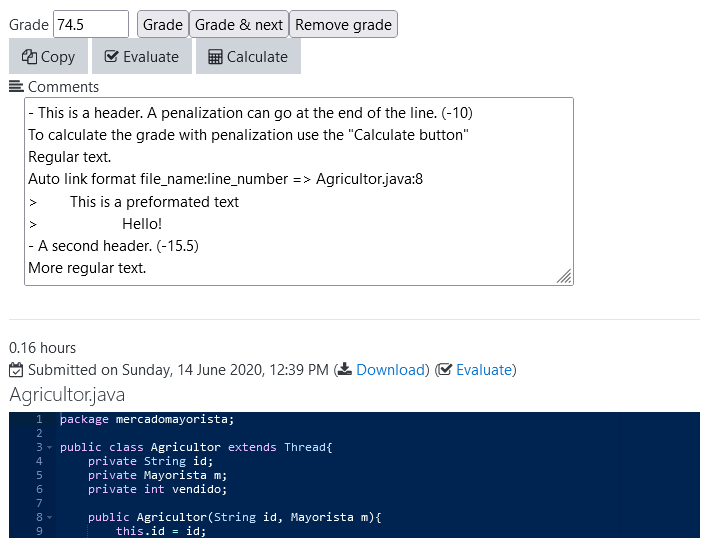
Example of grade page
Bellow the form, the page shows information as the Submission view with the automatic evaluation, the manual evaluation, and the files submitted. Also at the right of the form, the list of previous headers used is shown. These headers may be reused by clicking on them.
The student can see the grade and feedback in the Moodle grade book or in the Submission view.
Example of submission view page with grading information
3.11. Previous submissions list
This page shows for a student and an activity the list of submissions saved in the system. Also shows two reports obtained of analyzing these submissions.
3.11.1. Code evolution
This graphic report shows the evolution of the size in bytes of each file in each submission.
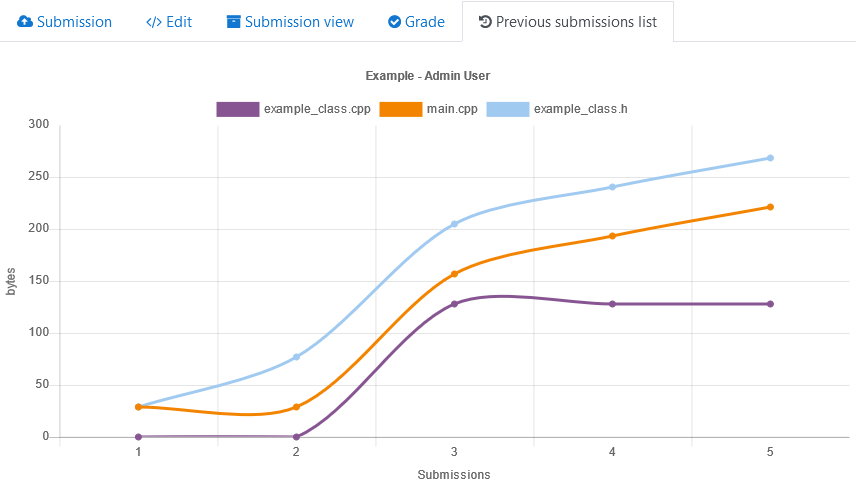
Example of student’s code evolution report
3.11.2. Time spent
This graphic report shows the student’s time spent in this activity. The horizontal axis represents each period of the student’s continuous time of work and the vertical axis is the time of each period in hours. Notice that these parameters are calculated based on the submissions saved then they are an estimation of the parameter, not its real value.
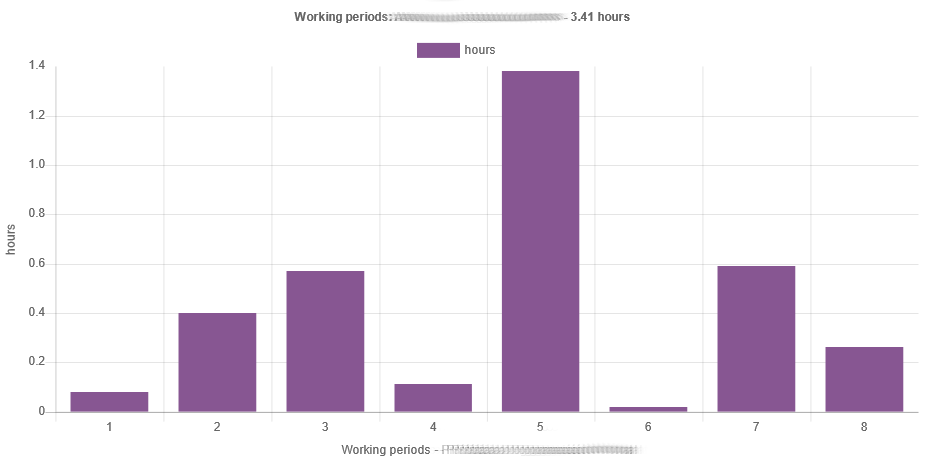
Example of student’s time spent in the activity.
3.11.2.1. Previous submissions
The last part of this page is the list of all submissions of the student order from newest to oldest. For each submission, the system shows: * A sequence number. * The submission date. * The description that contains the names of the files, their size in bytes, and their number of lines. * An action menu that allows to see or copy in the teacher’s workspace any submission.
Also, there is the possibility to see this page with “More details” meaning also shows the content of all the files of the student’s submissions.
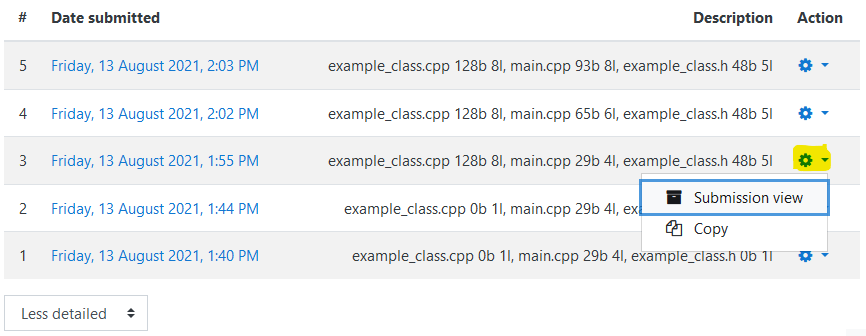
Example of previous submissions list
3.12. List of virtual Programming Labs
This report is only available from the action menu and shows the VPL activities in a course. To students, it shows its available activities, for teachers it shows all the activities.
It shows the following data for each activity:
- A sequence number.
- section. The section of the course where the activity appears. Clicking goes to the course section.
- name. The activity name. Clicking goes to the activity.
- Available from. The date the activity is available for students.
- Due date. The date that the activity does not accept more submissions.
- Submissions. The number of students’ submissions. Clicking goes to the list of students’ submissions.
- Graded. The number of students’ submissions that have been graded and not graded in parenthesis. Clicking goes to the list of students’ submissions not graded.
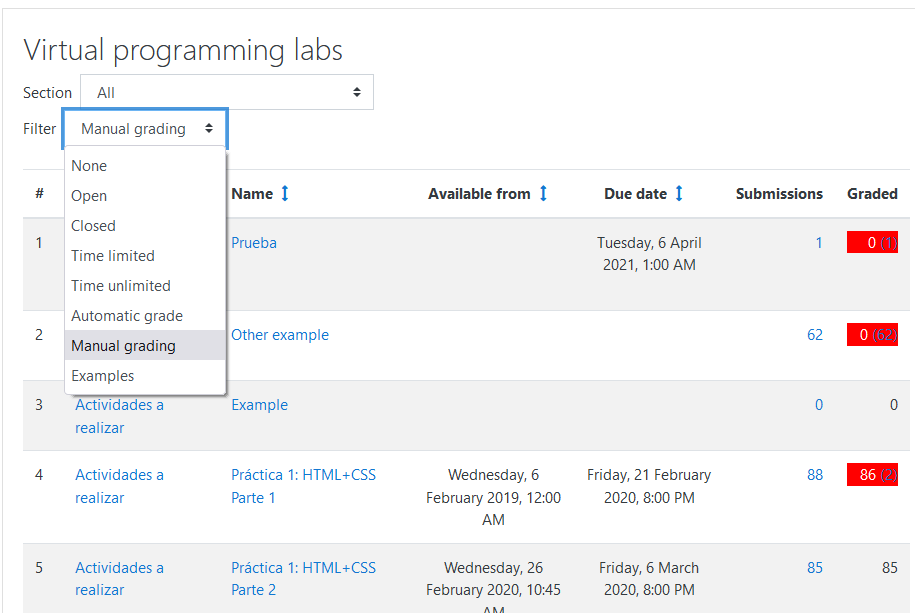
Example of list of virtual Programming Labs in a course
3.12.1. Filtering
The list of vpl activities of the course can be filtered in two ways: by selecting a section of the course and by selecting the state of the activity:
- Open: Select the activities that at this moment students can submit files.
- Closed: Select the activities that at this moment students can not submit files.
- Time limited: Select the activities that have set a “due date”.
- Time unlimited: Select the activities that have not set a “due date”.
- Automatic grade: Select the activities that have grades and have set automatic grading.
- Manual grading: Select the activities that have grades and have not set automatic grading.
- Examples: Select the activities that are of type example.
3.13. Creating a simple activity
This subsection shows how to create a basic VPL activity of general-purpose.
- Start creating a VPL activity as shown at section start.
- Set the name of the activity. The system uses this name as the activity identification for users.
- Set the description. The description contains the details of the task the student must do.
- Set the due date. After the due date, students can not submit new code versions.
- Set the maximum number of files that the students can upload in each submission.
- If this activity gives grades to students, you must set the type of grade and the maximum grade.
- Save the new activity.
- Click on the activity name just created and at the action menu go to “Execution options” and set the execution actions (run/debug/evaluate) that you allow the students do.
The VPL activity is ready to be used by studetns.
For more details about VPL, visit the VPL home page or the VPL plugin page at Moodle.