4. IDE
The VPL IDE is a web multi-file editor that supports syntax highlighting of the source code, running or debugging code in text and graphic terminals, evaluating programs to get feedback, and more. The IDE aims to be simple to use, hiding options when not needed.
The IDE is organized into five panels that are not always visible.
Actions menu at the top.
File list at the left.
Editing zone in the middle.
Info panel at the right.
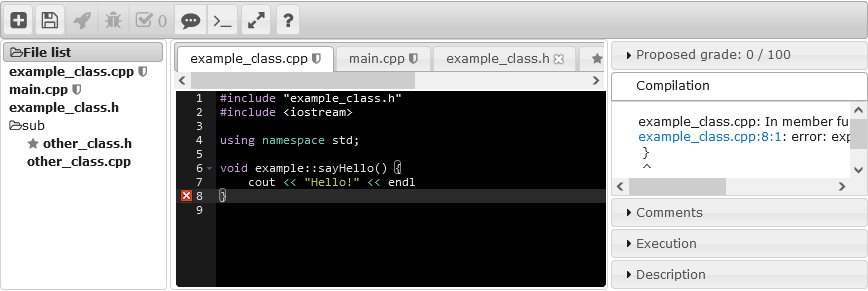
Example of VPL IDE with all panels available
4.1. Actions menu
The menu is organized like a row of buttons with the features available. Each button has an icon as identification and a name that shows as a tooltip. Commonly used buttons have also a keyboard shortcut. The buttons are described below.
4.1.1. Show more/less

Show more button
The show more/less button controls the menu mode. By default and if it is not needed in the “show more” mode, the menu is in “show less” mode.

Menu in show less mode

Show less button
When the menu changes mode, the button also changes.

Menu in show more mode
4.1.2. Save (Ctrl-S)

Save button
Saves (Ctrl-S) all the files with the effect of a submission.
4.1.3. Run (Ctrl-F11)

Run button
Runs (Ctrl-F11) the program. If the compilation succeeds, a text or graphic terminal appears to interact with the user. If the activity is configured as a web application (PHP/HTML), the result is shown in a local browser window. If the compilation produces errors or warnings, the “info panel –> Compilation” will show them.
4.1.4. Debug (Alt-F11)

Debug button
Debugs (Alt-F11) the program. If the compilation succeeds, a text or graphic terminal appears to interact with the user. If the compilation produces errors or warnings, the “info panel –> Compilation” will show them.
4.1.5. Evaluate (Shift-F11)

Evaluate button
Launches an automatic evaluation (Shift-F11) of the program. If the compilation succeeds, the evaluation starts; no terminal is shown. When the evaluation ends, the “info panel –> Comments” will show the feedback and “info panel –> Proposed grade” will show the grade if available. If the compilation produces errors or warnings, the “info panel –> Compilation” will show them. This button also shows the number of evaluations the student has requested.
4.1.6. Student comments

Student comments button
Here students can write comments that go with the submission and will be shown to the teacher.
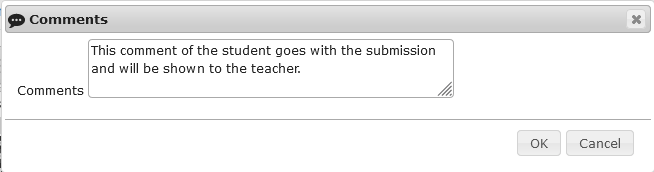
Student comments example
4.1.7. Show Terminal

Show Terminal button
This action will show the last open terminal, whether textual or graphical. The user can change the terminal size; the new terminal size will be used in the next run or debug action. The user can also review the information of the last iteration with the terminal.
See also terminal features.
4.1.8. Show/hide file list (Ctrl-L)

Show file list button

Hide file list button
This action will show or hide the file list panel. The file list panel shows all the files in the current submission. Open files are shown in bold, and modified files are marked. You can rename a directory by double-clicking on it in the file list panel. This allows renaming all files inside that directory at once.
4.1.9. Additional features
Double-clicking on a file name allows the user to change it. The width of the panel can be changed by clicking and holding the right border.
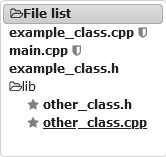
Example of file list panel
4.1.10. New file (Alt-N)

New file button
This action allows adding a new file to the set of files to submit.
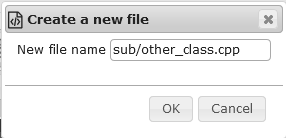
New file example
4.1.11. Rename file (Ctrl-R)

Rename file button
This action allows renaming the current file. This action also can be done by double-clicking on the file name.
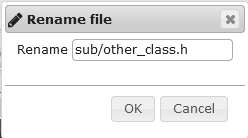
Rename file example
4.1.12. Delete file (Ctrl-D)

Delete file button
This action allows deleting the current file after user confirmation.
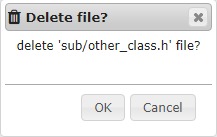
Delete file confirmation
See also Delete multiple files.
4.1.13. Import files (Ctrl-I)

Import files button
Import action opens a selection of files in the local machine. The selected files will be added to or replace files in the current file set. All the files will be added to or replace files in the top directory. If a file is a zip file, it will be uncompressed and added, preserving its relative path. This process does not support file names in UTF-8 coding.
See also Download and Drag and drop.
Note
To import a zip file without uncompressing it, the zip file to add must be inside another zip file.
4.1.14. Download

Download files button
The download action is only available with no file modified or with a submission just saved. The submission files will be packed in a zip file conserving their path.
See also Import files and Drag and drop.
4.1.15. Reset files

Reset files button
This action resets the current Requested files to their initial content after user confirmation. The rest of the files, if any, are not modified.
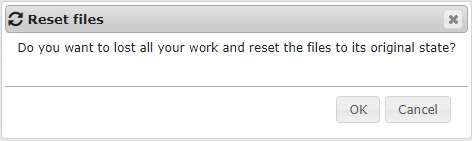
Reset files confirmation
4.1.16. Reorder files (Ctrl-O)

Reorder files button
The order of files in a submission determines the programming language detected for launch and in some cases the file as the program start point. This action allows reordering the files. To change a file position, drag and drop the file name.
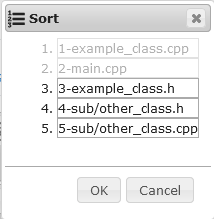
Reorder files example
4.1.17. Delete multiple files

Delete multiple files button
This action allows selecting the files and deletes them with one click.
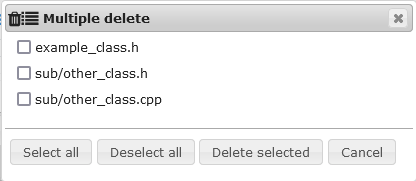
Delete multiple files example
4.1.18. Font size

Font size button
Allows you to change the font size of the text in the editor. This selection is saved in the user preferences, keeping the selected value for future sessions. Note that the font size can commonly be changed in a browser with Ctrl+, Ctrl-, or Ctrl=.
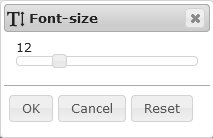
Font size example
4.1.19. Theme selection

Theme selection button
Allows changing the theme of the editor. This selection is saved in the user preferences, keeping the selected theme for future sessions.
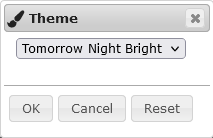
Theme selection example
4.1.20. Undo (Ctl-Z)

Undo button
Undoes the last edit in the current file.
4.1.21. Redo (Ctrl-Shift-Z|Ctrl-Y)

Redo button
Redoes the last undone action in the current file.
4.1.22. Select all (Ctrl-A)

Select all button
Selects all text in the current file.
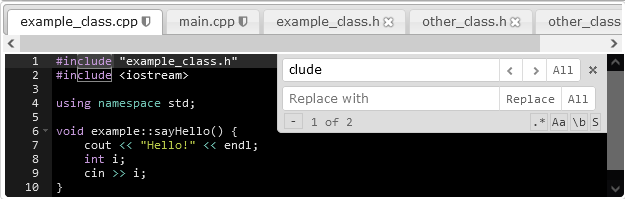
4.1.23. Find (Ctl-F)

Find button
Opens the find form for the current file.

Find example
4.1.24. Replace (Ctl-H)

Replace button
Opens the replace form for the current file.
Replace example
4.1.25. Find next (Ctrl-K)

Find next button
Finds the next occurrence of the pattern from the current cursor position to the end of the file.
4.1.26. Full/regular screen (Alt-F|F11)

Full screen button

Regular screen button
Toggles the IDE size between full-page and regular size. You can also use the F11 key to toggle fullscreen mode. If the IDE is in full-page mode, the menu bar shows the name of the user or the student in case of the copy submission operation.

User name in menu bar example
4.1.27. Help

Help button
Shows copyright and licence of software used. The keyboard shortcuts of the menu and the editor.
4.1.28. Time left
If the VPL activity has set a due date the IDE shows a clock icon and the time left in ISO format. If the user clicks on the time left the time may be hidden or shown, but the clock icon cannot be hidden. The background of the time left and icon change from grey to orange when less than 15 minutes left, to red when less than 5 minutes left, and to black when the time runs out. When the background is red, the IDE shows the time, and it cannot be hidden.


4.2. Editor
The editor displays a status line showing file name, cursor position (row and column), and programming language.
Note
Files appearing in both “required files” and “execution files” are viewed as read-only. Students can view the content but cannot modify it.
Other editor commands are available using “open command palette (F1)” or using a keyboard shortcut:
Show settings menu (Ctrl-,)
Go to next error (Alt-E)
Go to previous error (Alt-Shift-E)
Select all (Ctrl-A)
Go to line (Ctrl-L)
Fold (Alt-L|Ctrl-F1)
Unfold (Alt-Shift-L|Ctrl-Shift-F1)
Toggle fold widget (F2)
Toggle parent fold widget (Alt-F2)
Fold other (Alt-0)
Unfold all (Alt-Shift-0)
Find next (Ctrl-K)
Find previous (Ctrl-Shift-K)
Select or find next (Alt-K)
Select or find previous (Alt-Shift-K)
Find (Ctrl-F)
Select to start (Ctrl-Shift-Home)
Go to start (Ctrl-Home)
Select up (Shift-Up)
Go line up (Up)
Select to end (Ctrl-Shift-End)
Go to end (Ctrl-End)
Select down (Shift-Down)
Go line down (Down)
Select word left (Ctrl-Shift-Left)
Go to word left (Ctrl-Left)
Select to line start (Alt-Shift-Left)
Go to line start (Alt-Left|Home)
Select left (Shift-Left)
Go to left (Left)
Select word right (Ctrl-Shift-Right)
Go to word right (Ctrl-Right)
Select to line end (Alt-Shift-Right)
Go to line end (Alt-Right|End)
Select right (Shift-Right)
Go to right (Right)
Go to page down (PageDown)
Scroll up (Ctrl-Up)
Scroll down (Ctrl-Down)
Toggle recording (Ctrl-Alt-E)
Replay macro (Ctrl-Shift-E)
Jump to matching (Ctrl-|Ctrl-P)
Select to matching (Ctrl-Shift-|Ctrl-Shift-P)
Expand to matching (Ctrl-Shift-M)
Remove line (Ctrl-D)
Duplicate selection (Ctrl-Shift-D)
Sort lines (Ctrl-Alt-S)
Toggle comment (Ctrl-/)
Toggle block comment (Ctrl-Shift-/)
Modify number up (Ctrl-Shift-Up)
Modify number down (Ctrl-Shift-Down)
Replace (Ctrl-H)
Undo (Ctrl-Z)
Redo (Ctrl-Shift-Z|Ctrl-Y)
Copy lines up (Alt-Shift-Up)
Move lines up (Alt-Up)
Copy lines down (Alt-Shift-Down)
Move lines down (Alt-Down)
Delete (Delete)
Backspace (Shift-Backspace|Backspace)
Cut or delete (Shift-Delete)
Remove to line start (Alt-Backspace)
Remove to line end (Alt-Delete)
Remove to line start hard (Ctrl-Shift-Backspace)
Remove to line end hard (Ctrl-Shift-Delete)
Remove word left (Ctrl-Backspace)
Remove word right (Ctrl-Delete)
Outdent (Shift-Tab)
Indent (Tab)
Block outdent (Ctrl-[)
Block indent (Ctrl-])
Transpose letters (Alt-Shift-X)
To uppercase (Ctrl-U)
To lowercase (Ctrl-Shift-U)
Expand to line (Ctrl-Shift-L)
Open link (Ctrl+F3)
Open command palette (F1)
Add cursor above (Ctrl-Alt-Up)
Add cursor below (Ctrl-Alt-Down)
Add cursor above skip current (Ctrl-Alt-Shift-Up)
Add cursor below skip current (Ctrl-Alt-Shift-Down)
Select more before (Ctrl-Alt-Left)
Select more after (Ctrl-Alt-Right)
Select next before (Ctrl-Alt-Shift-Left)
Select next after (Ctrl-Alt-Shift-Right)
Toggle split selection into lines (Ctrl-Alt-L)
Align cursors (Ctrl-Alt-A)
Find all (Ctrl-Alt-K)
4.2.1. Terminal features
4.2.1.1. Textual terminal
The textual terminal is compatible with xterm with some limitations as the size is fixed at 25x80 chars. The terminal window can be moved by clicking and holding the title bar, and resized by clicking and holding a border. If the new size is smaller than needed, a scrollbar appears.
The buttons on the terminal title bar allow other features as changing the terminal theme and access to the clipboard.
4.2.1.1.1. Terminal theme
The terminal theme changes with every click on the button. The selection is saved for the next sessions in the user preferences.
Terminal theme example
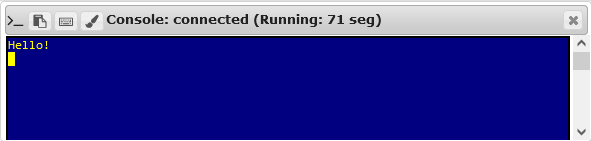
4.2.1.1.2. Textual terminal clipboard
The terminal clipboard provides a form to access two features. The text output from the terminal in each run is kept and is accessible from the upper text input. The lower input allows you to write text that can be sent as typed to the program. This text is kept from run to run.
Terminal clipboard
4.2.1.2. Graphics terminal
The graphical terminal is a VNC client of a Linux X Window server. The default size fits within the current browser window size. The terminal window can be moved by clicking and holding the title bar, and resized by clicking and holding a border. The new size will be applied in the next graphical terminal use.
4.2.1.2.1. Graphics Terminal clipboard
The clipboard for the graphic terminal will be functional if VNC xclipboard tool runs in the X server.
4.3. Drag and drop
The IDE supports drag and drop external files into the editor. The effect is identical to the import files feature.
4.4. Binary files
VPL supports the handling of binary files identifying them based on the file extension.
Currently supported binary extensions are zip, jar, pdf, tar, bin, 7z, arj, deb, gzip, rar, rpm, dat, db, dll, rtf, doc, docx, odt, exe, and com.
For compatibility with older VPL versions, it is possible to use files in base-64 format. When files with extension b64 are sent to an execution server are decoded and extension removed. Example: A ‘photo.jpg.b64’ file in base64 becomes ‘photo.jpg’ in binary.
4.5. Multimedia files
VPL supports the handling of popular types of image, audio, and video files. These files are shown or played in the editor and when viewing submissions.
Currently supported file extensions are:
Images: gif, jpg, jpeg, png, ico.
Audio: wav, aiff, pcm, mp3, aac, ogg, oga, wma, m4a, flac, alac, ape, wv, amr.
Video: mp4, webm, ogv, avi, mov, wmv, flv, mkv, m4v, mpeg, mpg, 3gp.
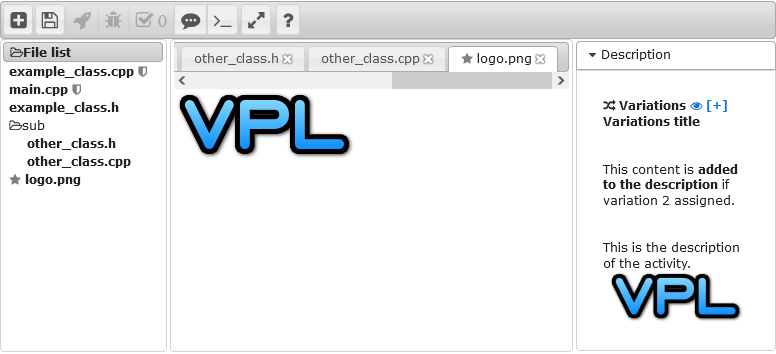
Image file in the editor
4.6. File Renaming
The file editor supports renaming files, including cases where only the character case changes (e.g., renaming file.c to File.c).
4.7. Files in subdirectories
VPL supports storing files in directories. The way to indicate the directory is by writing the relative pathname as the file name in the editor. For example, you can set the filename to “src/lib/util.c” and the util.c file will be located in the “src/lib” subdirectory of the user’s home directory when running.
For more details about VPL, visit the VPL home page or the VPL plugin page at Moodle.